Creating Presentations
Presentations are the core of Chapel Screen. Each presentation is a rich text document that you edit in the browser and project live to your audience.
The Editor
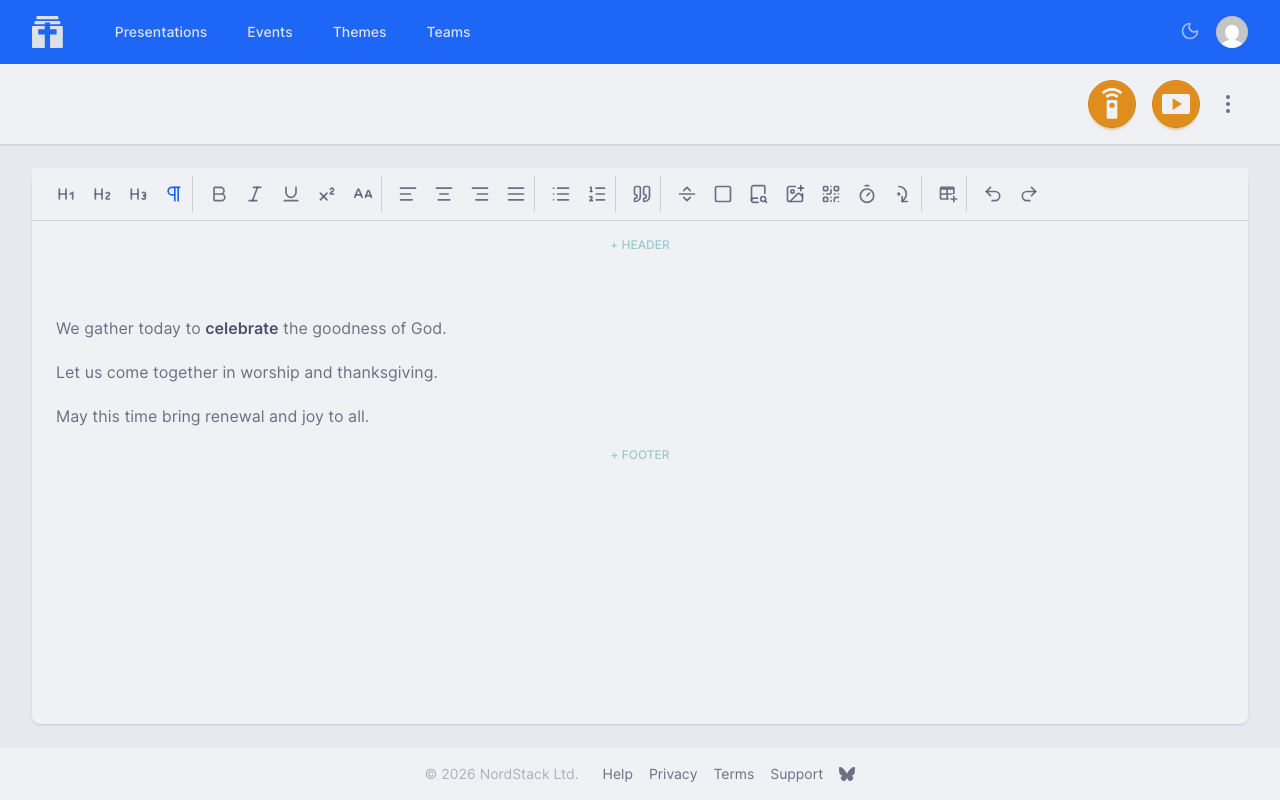
When you create or open a presentation, you'll see the editor. It works like a familiar word processor — type your content, and use the toolbar to apply formatting.
The editor supports:
- Bold, italic, and underline text
- Headings (multiple levels)
- Bullet and numbered lists
- Tables
- Text alignment (left, centre, right, justify)
- Superscript
- Blockquotes
- Images
- Videos
Everything you type is saved automatically and synced in real time. If you're working with a team, you'll see their changes appear as they type, complete with coloured cursors showing who's editing where.
Understanding Presentation Points
Presentation points are the navigation points in your presentation. When you present to an audience, you step through your content one point at a time — much like advancing slides, but more fluid.
Chapel Screen creates presentation points automatically from your text. Each sentence becomes a point, so your content flows naturally without needing to manually split it into slides.
You can also mark certain points as skip points. Skipped points still appear on screen, but the presenter won't pause on them — the content is visible as part of the surrounding context, but the controller jumps past them during navigation.
Page Breaks
Page breaks control how your content is divided into visual slides. There are two types:
- Soft page breaks — suggest a good place to split content. In individual display mode, the layout engine uses these as natural break points when content overflows the screen. In block mode, every soft break creates a new slide.
- Hard page breaks — always force a new slide, regardless of display mode.
Insert page breaks from the editor toolbar when you want explicit control over slide boundaries.

Special Elements
Beyond text and formatting, the editor toolbar lets you insert several special elements into your presentation.
Images
Insert images from the toolbar or by dragging a file into the editor. Each image has a sizing option that controls how it fills the slide:
- Full Screen — the image fills the entire slide, replacing the background
- Actual — the image displays at its original pixel size
- 100% / 75% / 50% / 25% — the image scales to that percentage of the slide width
Videos
Insert a video from the toolbar and choose a file from your device. The video uploads directly from your browser and is then processed for streaming — short clips are typically ready within a minute; longer videos take a little more time. You can keep editing while it processes.
- Videos can be up to 2 GB per file, with 2 GB of total video storage per account.
- Most common formats work (MP4, MOV, and anything your phone records) — the video is converted automatically during processing.
- If an upload is interrupted, reopen the presentation and choose the same file again — it resumes where it left off.
Like images, each video has a sizing option:
- Full Screen — the video plays over the entire slide, above the theme background
- 100% / 75% / 50% — the video scales to that percentage of the slide width
A video is a presentation point of its own — when presenting, navigate to it like any other point and playback controls appear in the controller. See Playing Videos for presenting with video and getting audio working on your screens.
You can copy a video block into another presentation — both presentations then share the same video, and it only counts once towards your storage. Removing a video block frees its storage automatically about a week later — within that week, undo restores it harmlessly. Deleting a presentation frees its videos sooner, unless another presentation still uses them.
QR Code
Insert a QR code by entering a URL. The QR code is generated dynamically and scales with the presentation theme. Useful for sharing links with your audience during a presentation — they can scan it directly from the projected screen.
Countdown Timer
Insert a countdown timer that counts down to a target time (in HH:MM format). When the countdown reaches zero, the presentation automatically advances to the next point. Choose from several visual styles:
- Flip Clock — animated flip digits
- Movie — classic film countdown
- Modern — clean digital display
- Loading — progress bar style
The timer runs live in both the controller preview and the viewer.
Tables
Insert a table from the toolbar. Once inserted, you can add or remove rows and columns, merge or split cells, and toggle header rows. Tables resize to fit the slide.
Slide Headers and Footers
Add a header or footer section to your slides. These appear at the top or bottom of the slide and are useful for persistent information like titles, copyright notices, or CCLI licence numbers. Inside a footer, you can insert a CCLI Licence placeholder that automatically displays your team's licence number.
Blank Slides
Insert a blank slide to create a deliberate pause or visual break in your presentation. Unlike blanking the screen from the controller, a blank slide is part of the content and appears at a specific position in your presentation points.
Presentation Settings
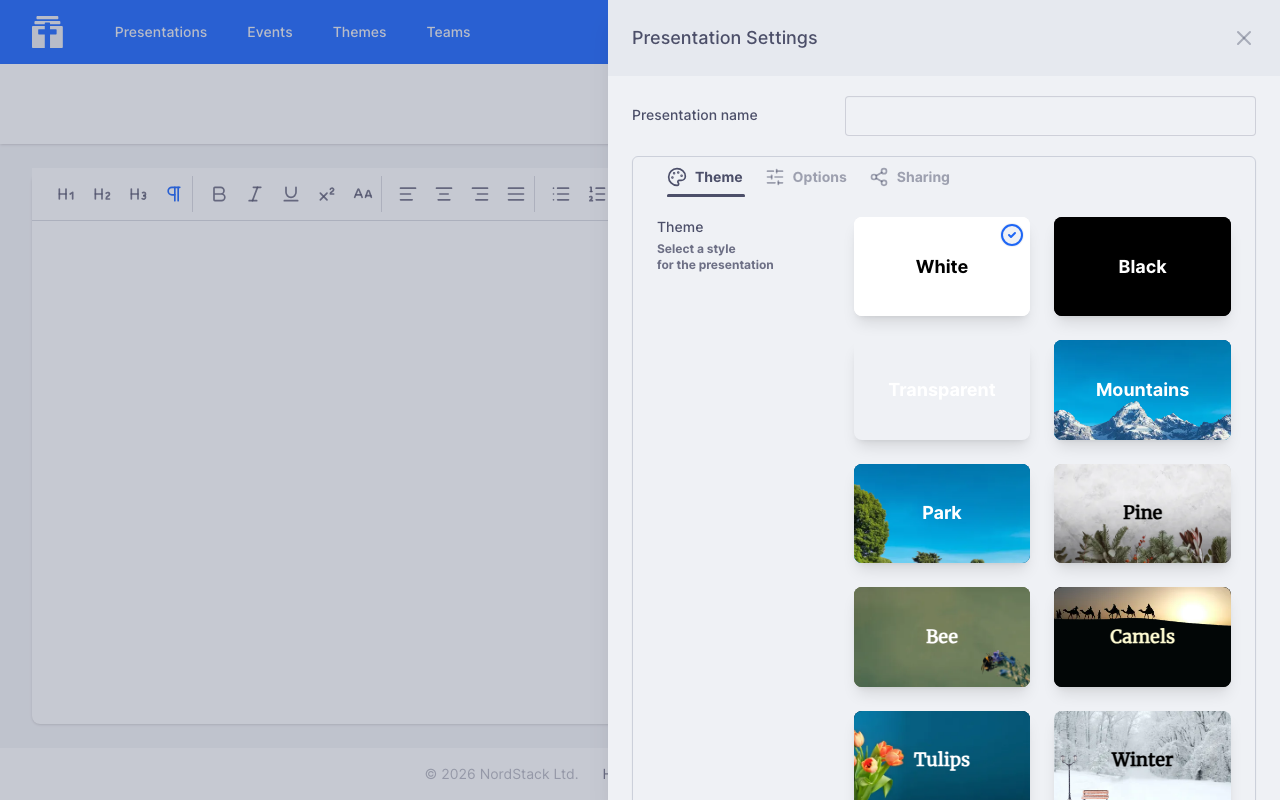
Open the presentation settings from the ellipsis menu (⋮) in the editor toolbar. The settings panel has three tabs: Theme, Options, and Sharing.
Naming Your Presentation
The presentation name appears at the top of the settings panel. Click on it to rename your presentation. The name is used in the presentations list and when searching.
Theme Tab
Choose how your presentation looks by selecting a theme. You'll see a grid of available themes — both the built-in system themes and any custom themes you've created or have access to through your teams. Click a theme to apply it; a checkmark shows which one is currently selected.
For more on creating your own themes, see the Custom Themes section.
Options Tab
The Options tab controls how your presentation content is displayed on screen. These settings affect all viewers and channels unless a channel overrides them.
Text Size
Controls how large text appears on the viewer screen. Choose from three presets:
- Small — fits more content on screen, good for text-heavy presentations
- Regular (default) — balanced for most uses
- Large — maximum readability, ideal for song lyrics or short announcements
Slides
Controls how your content is split into visual slides:
- Individual (default) — content is split into slides at soft page breaks when it would overflow the screen. This gives a traditional slide-by-slide feel.
- Continuous — all your content appears in a single scrolling view. Only hard page breaks create visual separations. The viewer scrolls to keep the current presentation point visible.
Reveal
Controls whether upcoming content is visible or hidden:
- Show All (default) — all content on the current slide is visible at once. The audience sees the full slide while you navigate through presentation points.
- Hide Upcoming — only content up to the current presentation point is visible. Lines appear one by one as you advance, keeping focus on what you're currently presenting.
Slide Content
Controls how many lines of content appear on each slide. This only applies when slides are set to Individual mode and devices are in landscape orientation.
- Auto (default) — the layout engine decides how much fits on each slide based on the screen size
- Block — each section between soft page breaks becomes its own slide
- Four — up to four lines per slide
- Two — up to two lines per slide
- One — one line per slide, for maximum impact
Highlight
When enabled, the current presentation point is visually emphasised with the theme's highlight colour. This helps your audience follow along when multiple points are visible at once — particularly useful in continuous mode or when reveal is set to show all.
Sharing Tab
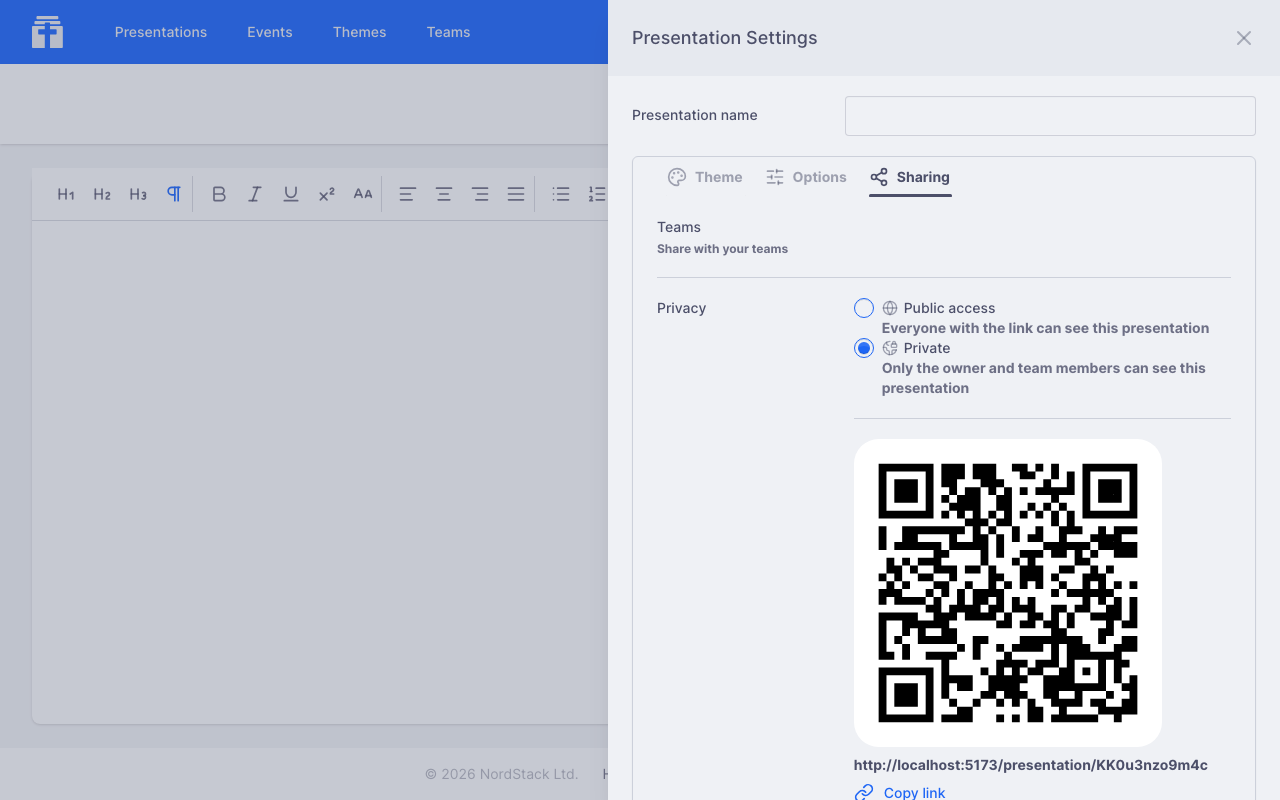
Teams
Share your presentation with any team you belong to. All members of that team will be able to view, edit, and present it. You can share with multiple teams at once, and remove a team's access at any time.
Privacy
Controls who can view your presentation via its link:
- Public access — anyone with the link can view the presentation in read-only mode
- Private (default) — only you and members of teams you've shared it with can see it
The Sharing tab also shows a QR code and direct link you can share with others.
For more on working with teams, see the Teams section.
Deleting a Presentation
Only the owner of a presentation can delete it. When you delete a presentation, it's also removed from any events that include it. This action cannot be undone.